Emails Helper
A macOS app designed to store, organize, and export emails — replacing messy spreadsheets with a clean, structured workflow.
Group your emails into domains and tags, import them individually or in bulk, and create customizable exports — while keeping track of everything thanks to detailed histories that show exactly when, how many, and what emails were used.
Stop juggling spreadsheets — manage all your email lists from one place.
Special thanks to Daria for her ideas, testing, and support
Main Features
Organize your tags into separate domains. Set up export rules, format and save folder
Store emails inside custom tags within each domain
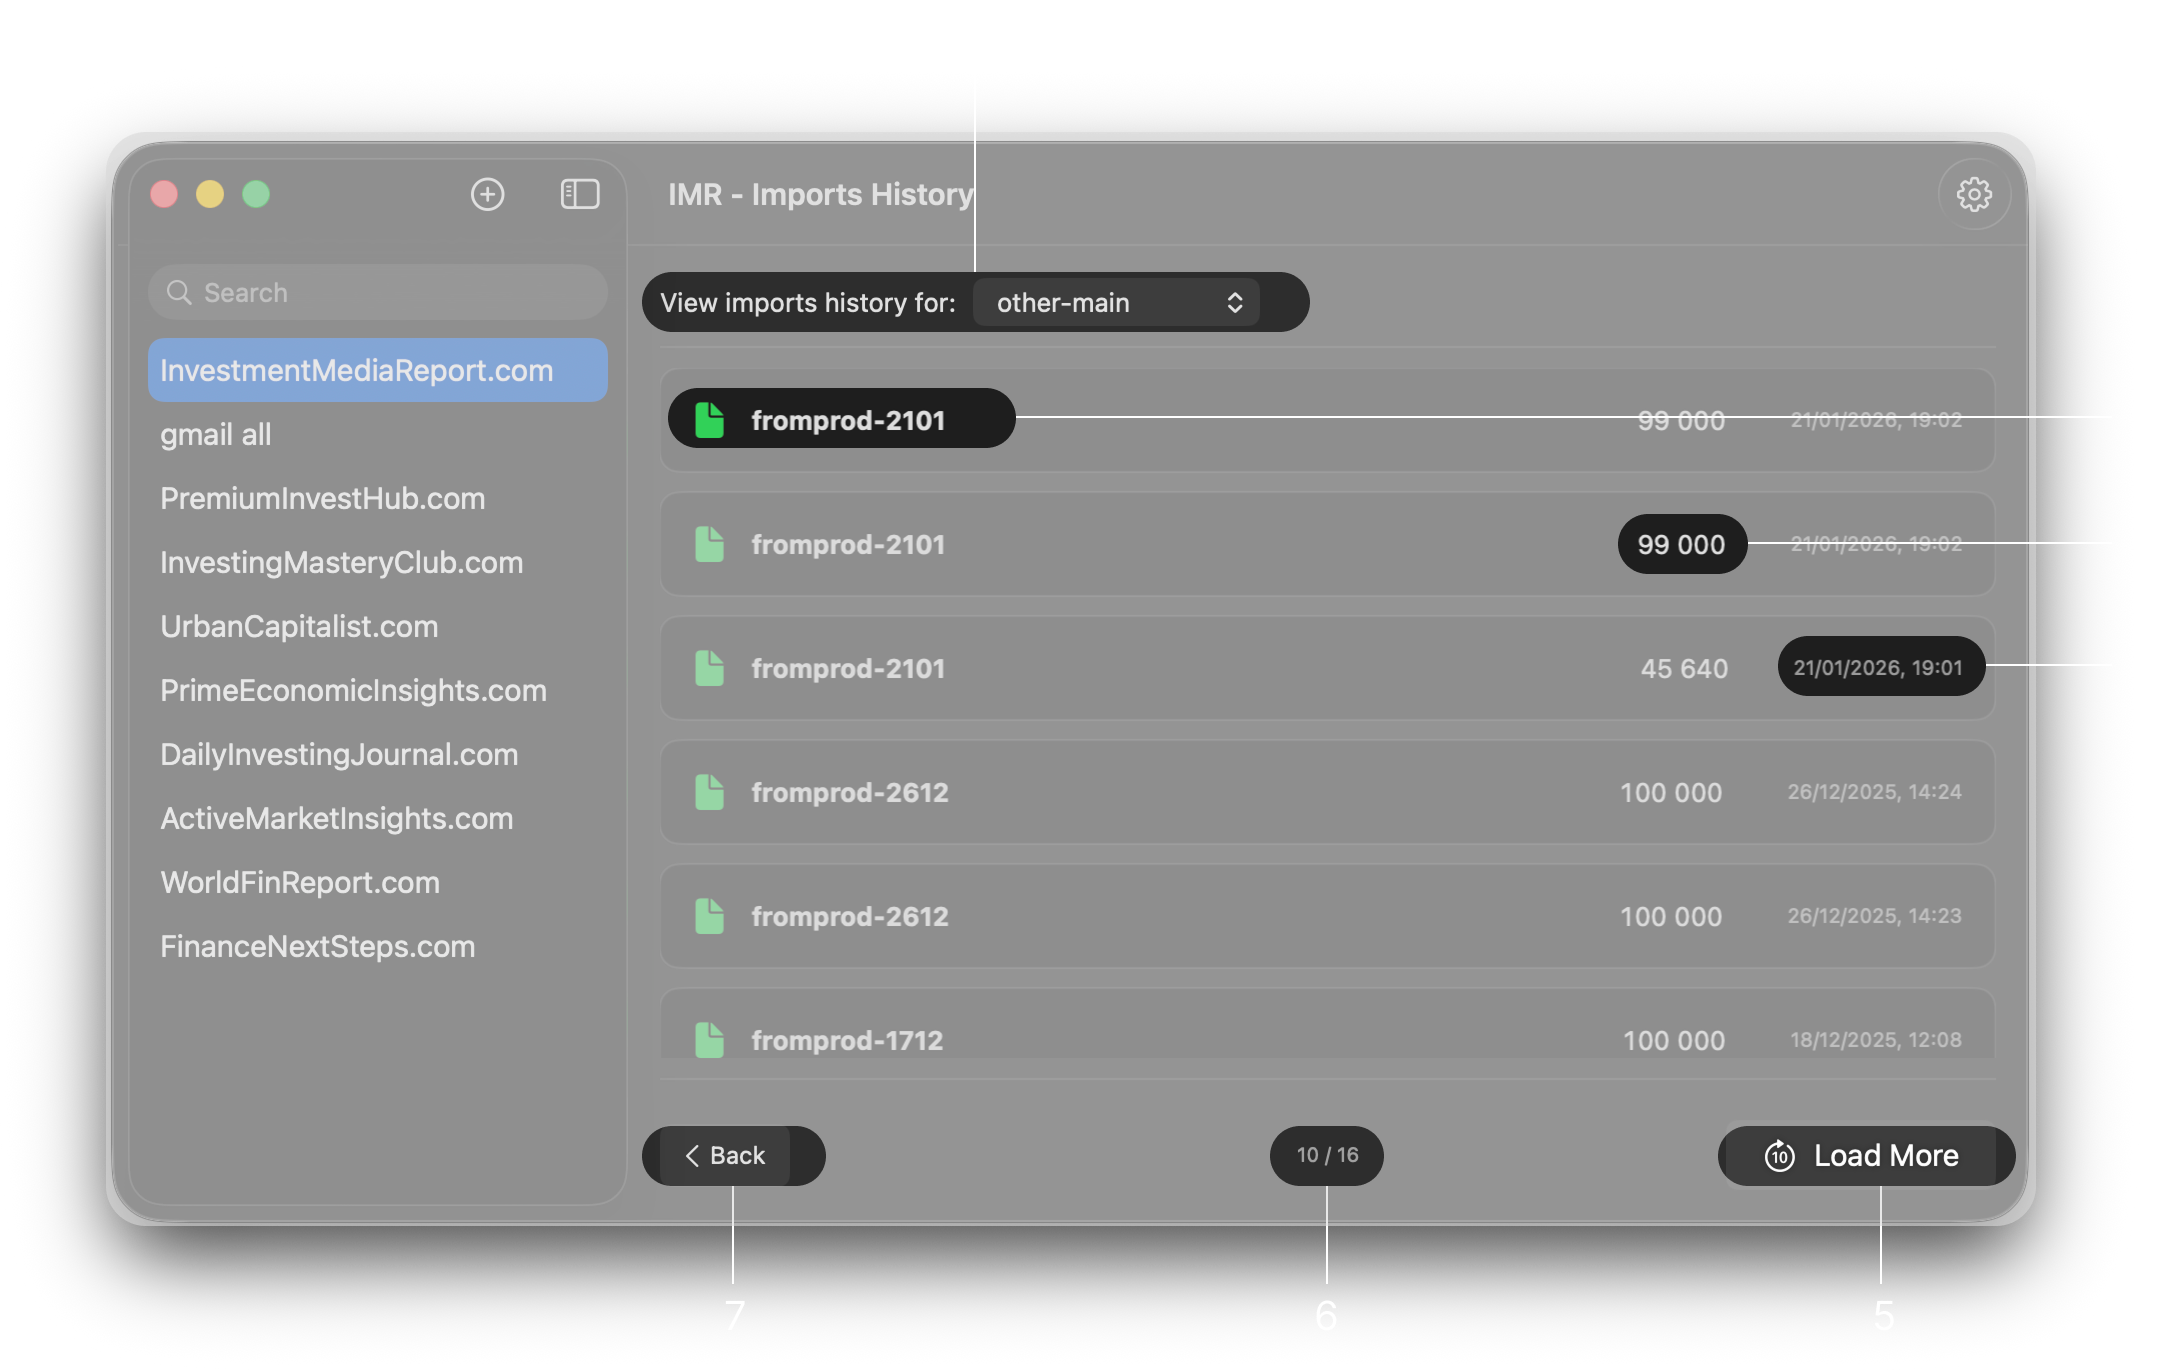
Import emails to each tag individually or use bulk import. View detailed import history to always know which emails you imported
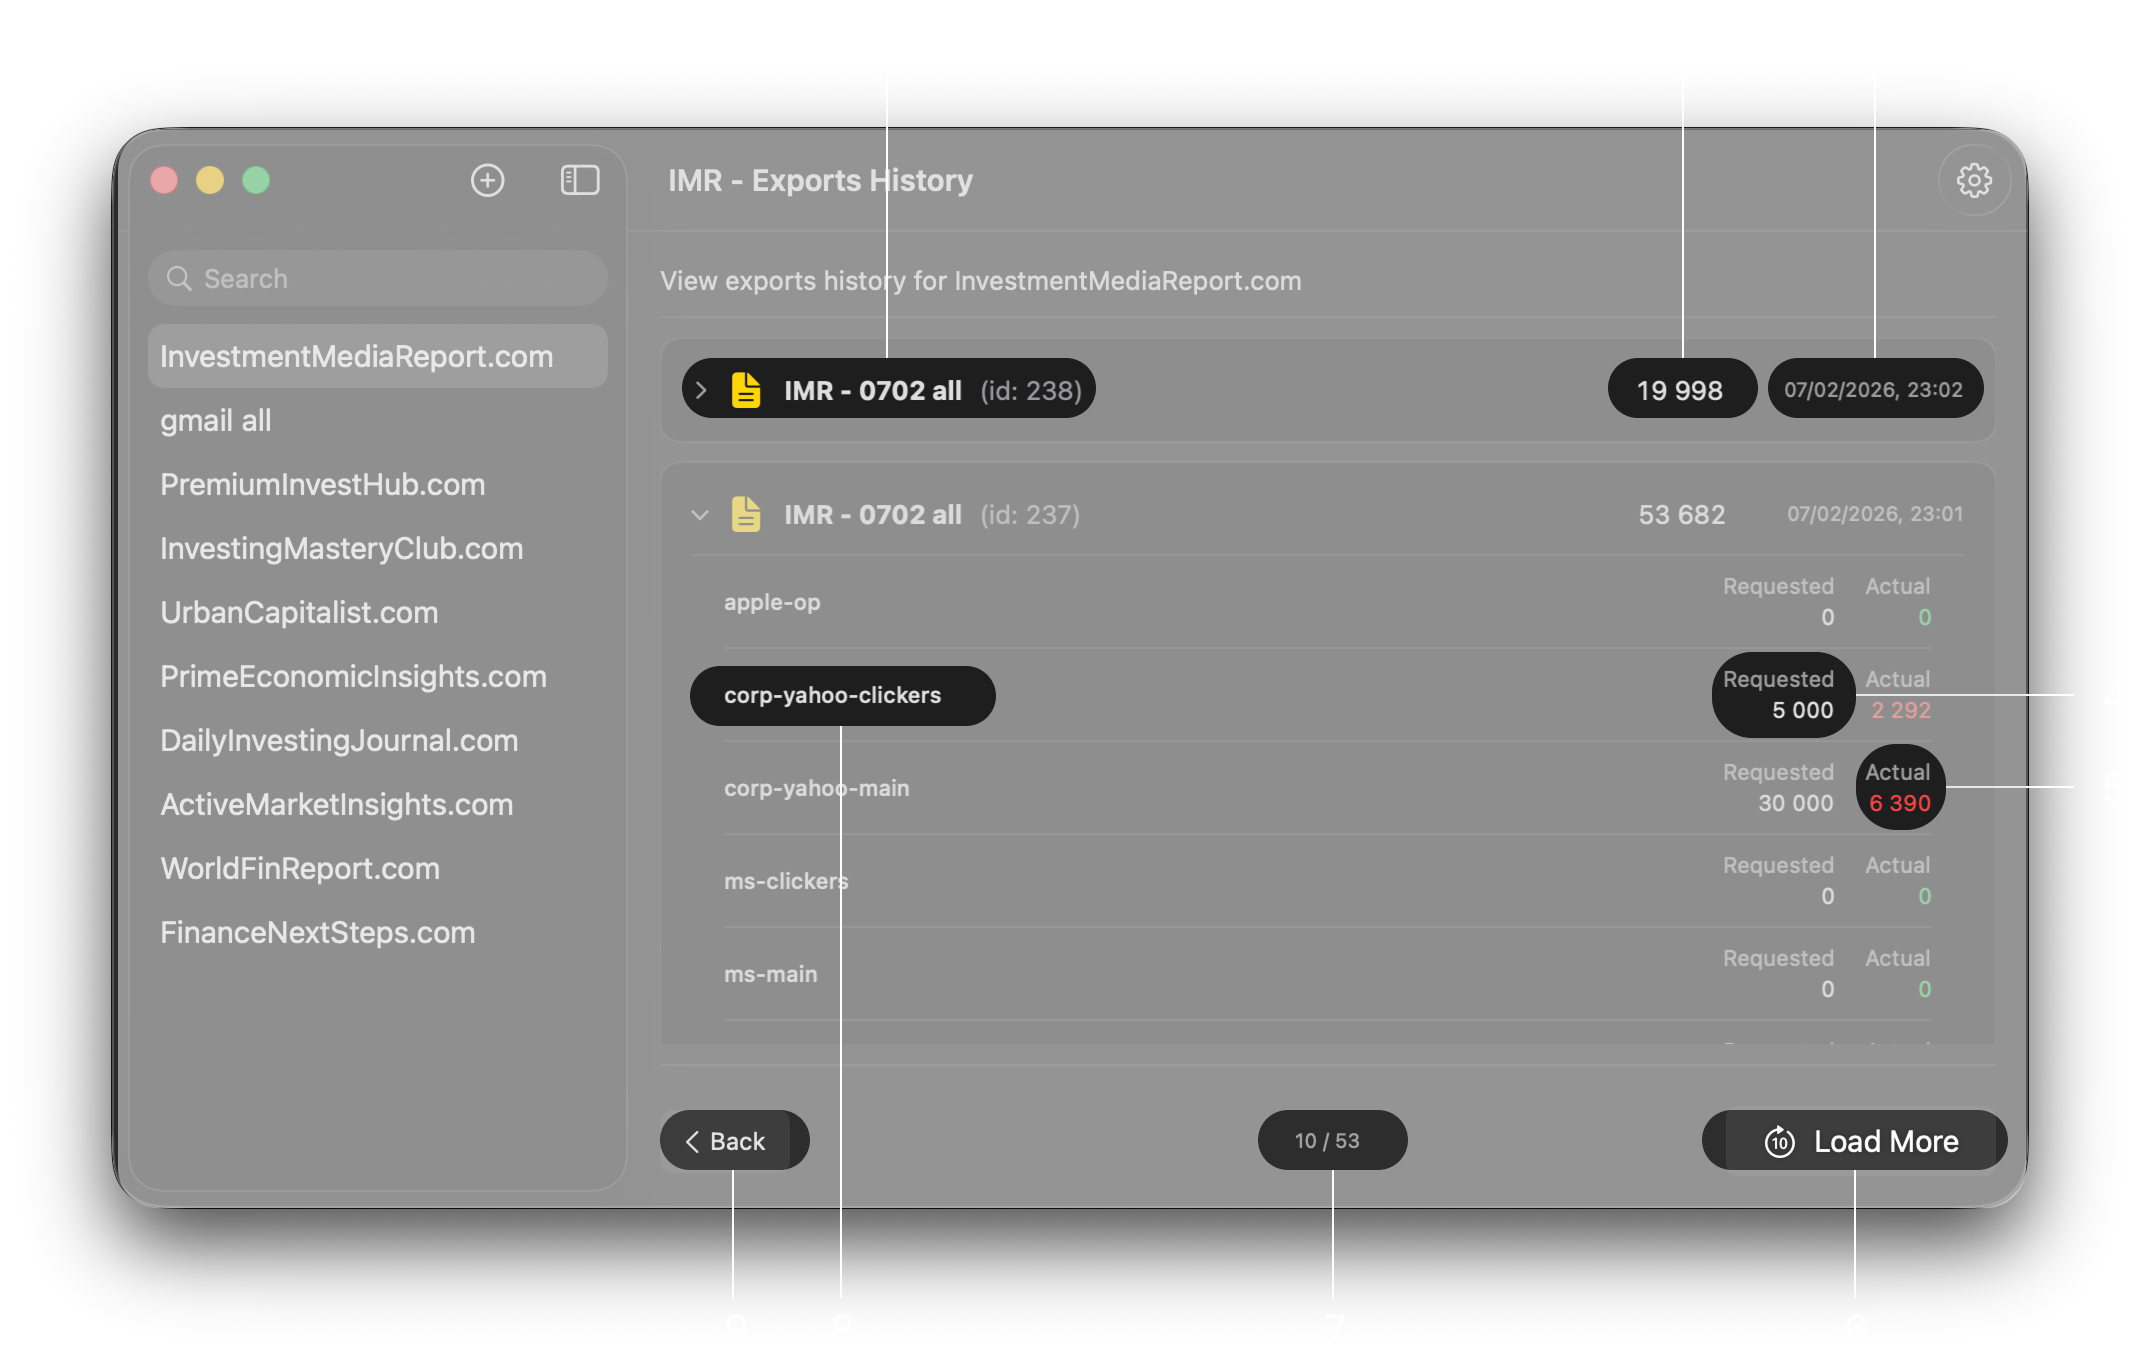
Create customizable exports by choosing exactly how many emails from any tag you want. View detailed exports history to always know when, how many, and which emails you used
Quick Start
Download and Launch the App
Download the app from here
or compile it yourself from the source code. Once downloaded, extract the .zip
file.
First-Time Setup: To launch the app for the first time, please follow these steps (you won't need to do this for future launches):
- Right-click (or two-finger tap) the app icon and select Show Package Contents.
- Navigate to Contents > MacOS. You will see a file named
Emails-Helper. - Open the Terminal (Press
Command + Spaceand type "Terminal"). - In the Terminal, type
chmod +x(make sure to include a space at the end). Do NOT press enter yet. - Drag the
Emails-Helperfile from the Finder window into the Terminal. This will automatically paste the file path. - The final command in your Terminal should look similar to
this:
chmod +x /Users/USERNAME/Downloads/Emails-Helper.app/Contents/MacOS/Emails-Helper
Press Enter. No text should appear in response; this indicates the command was successful.
Bypassing macOS Security:
- Go back to the main app icon and try to launch it normally.
- A warning will appear stating the app "cannot be opened because the developer cannot be verified." Click Cancel.
- Open System Settings and navigate to Privacy & Security.
- Scroll to the bottom. Under the "Security" section, you will see a message regarding "Emails Helper." Click Open Anyway.
- Enter your Mac password or use Touch ID to confirm.
The app will now launch and function normally for all future use!
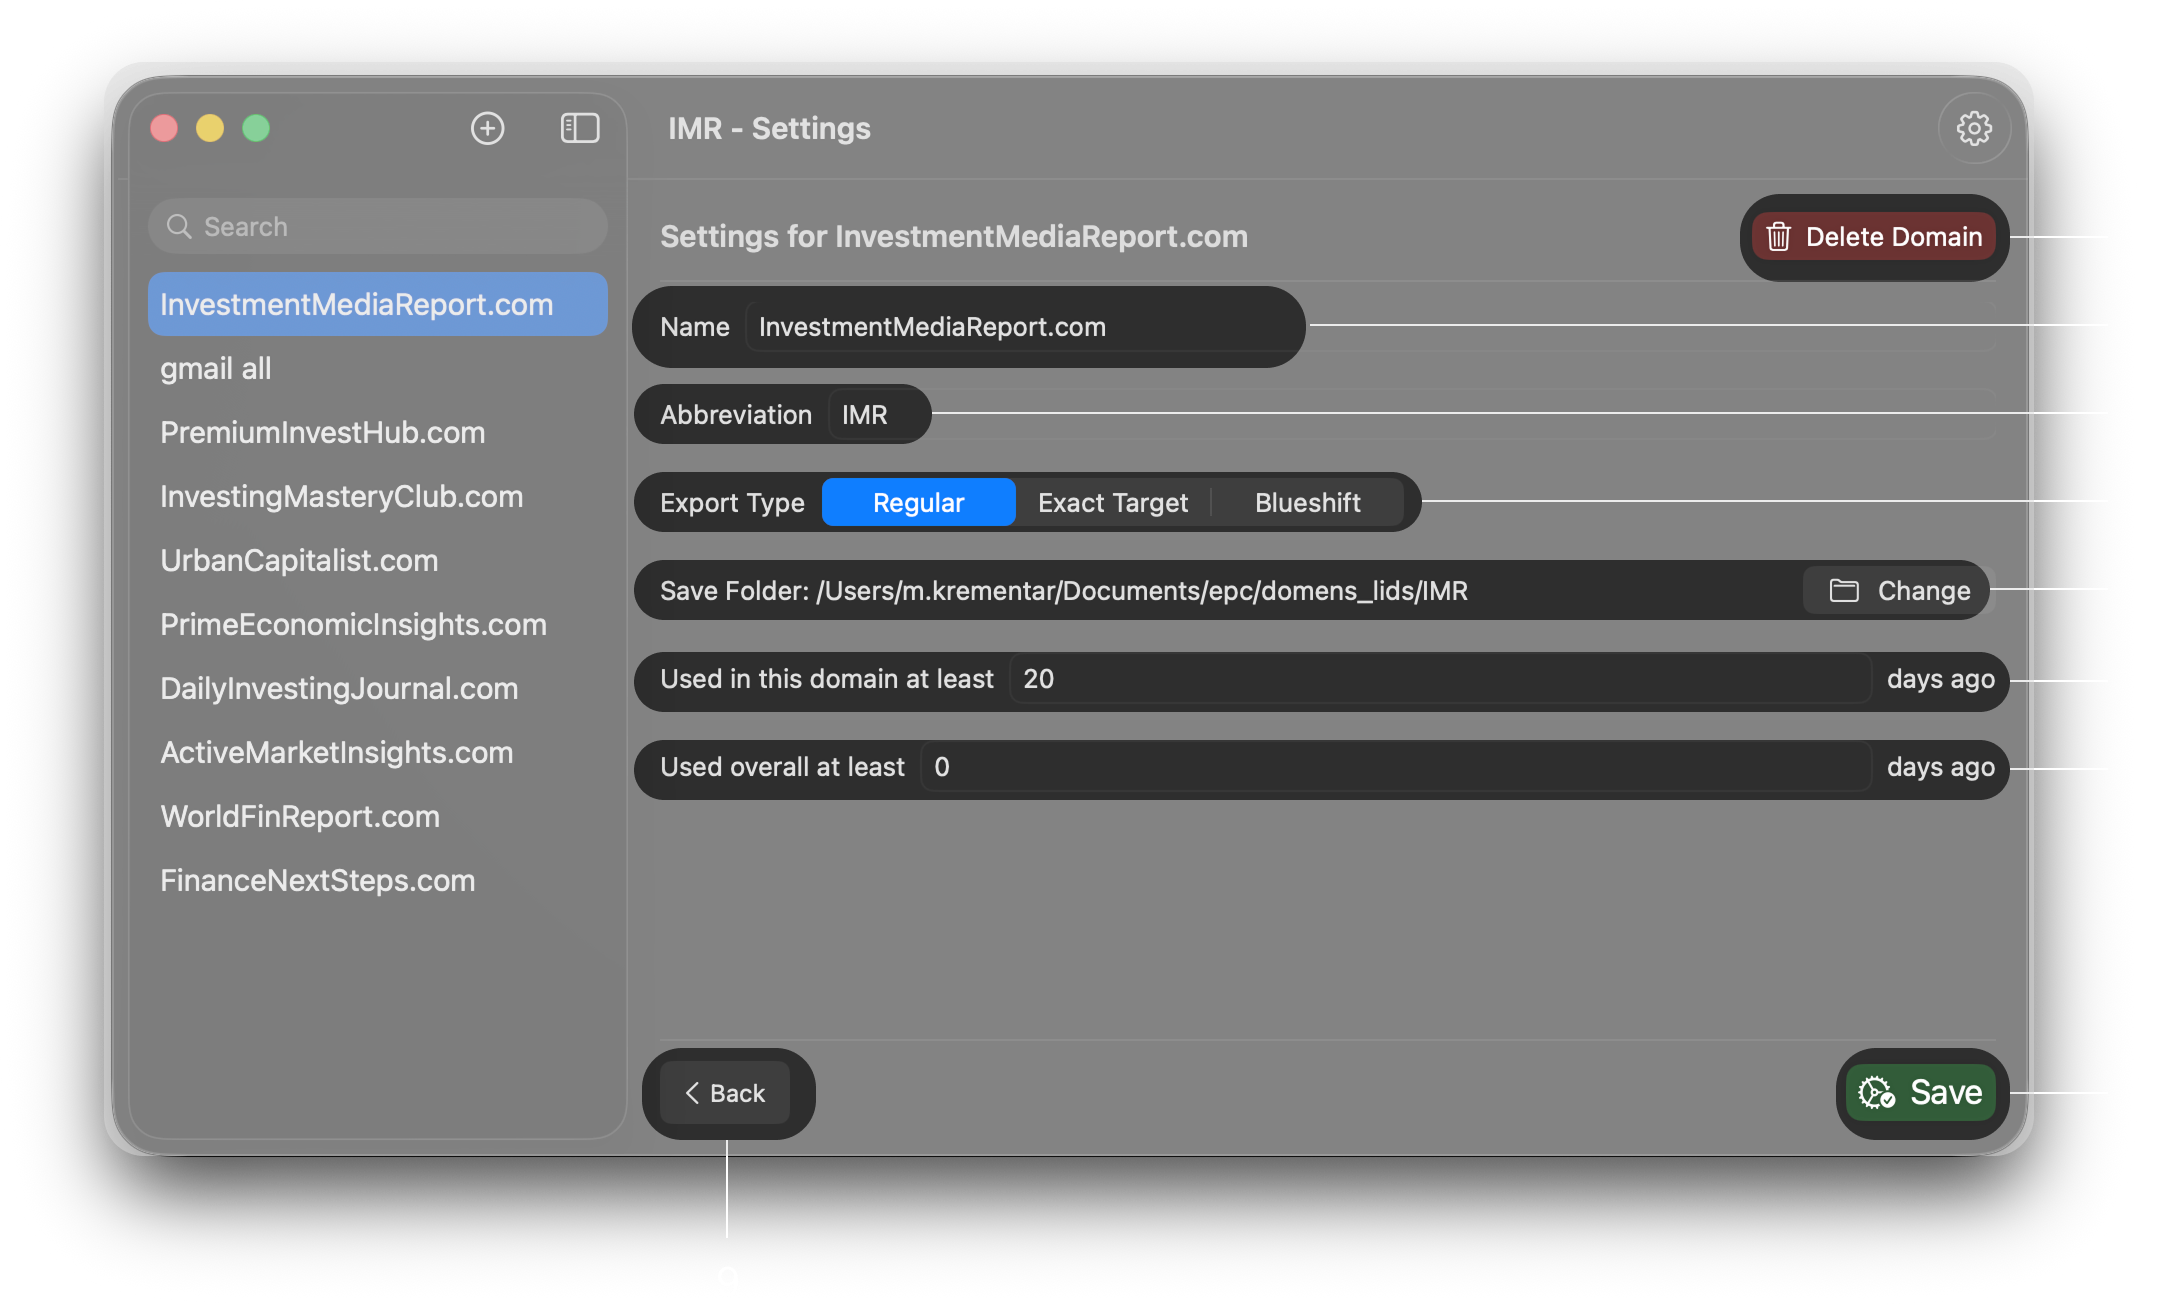
Create Domain
Start by creating a domain to manage your tags.
Click the plus button in the top left corner. Give it a name (such as your broadcast name) and abbreviation.
Choose the export type and folder where exported files will be saved.
Set up limits for email overuse if needed.
See Domain Settings guide for detailed explanations of each setting.
Create Tags
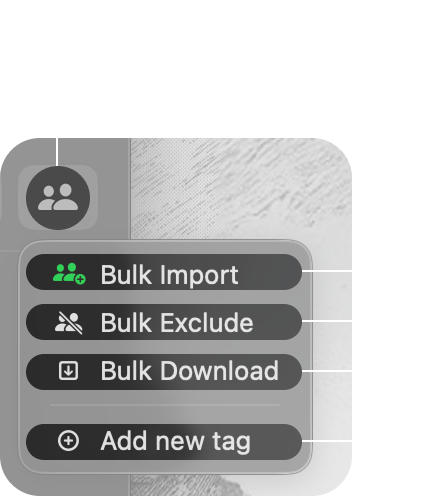
Inside your domain, press the button with two people in the top right and choose 'Add new tag'.
Give your new tag a name. You can create as many tags as you want.
Import Emails
You can import emails two ways:
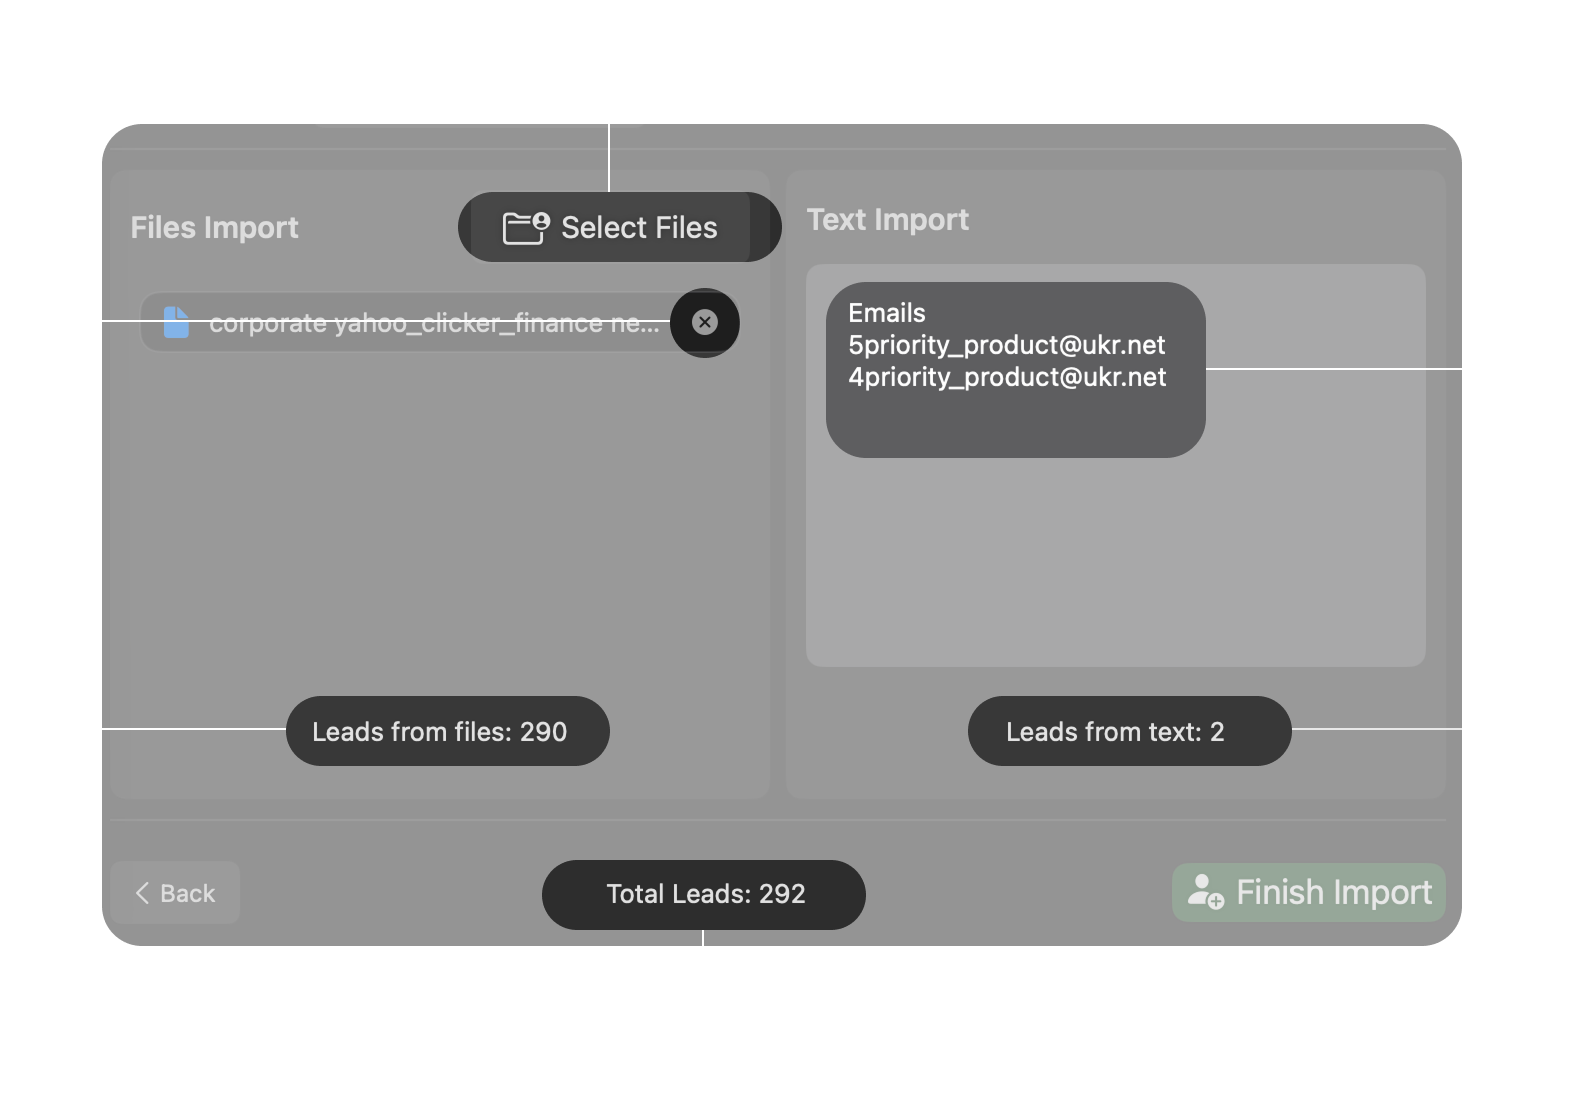
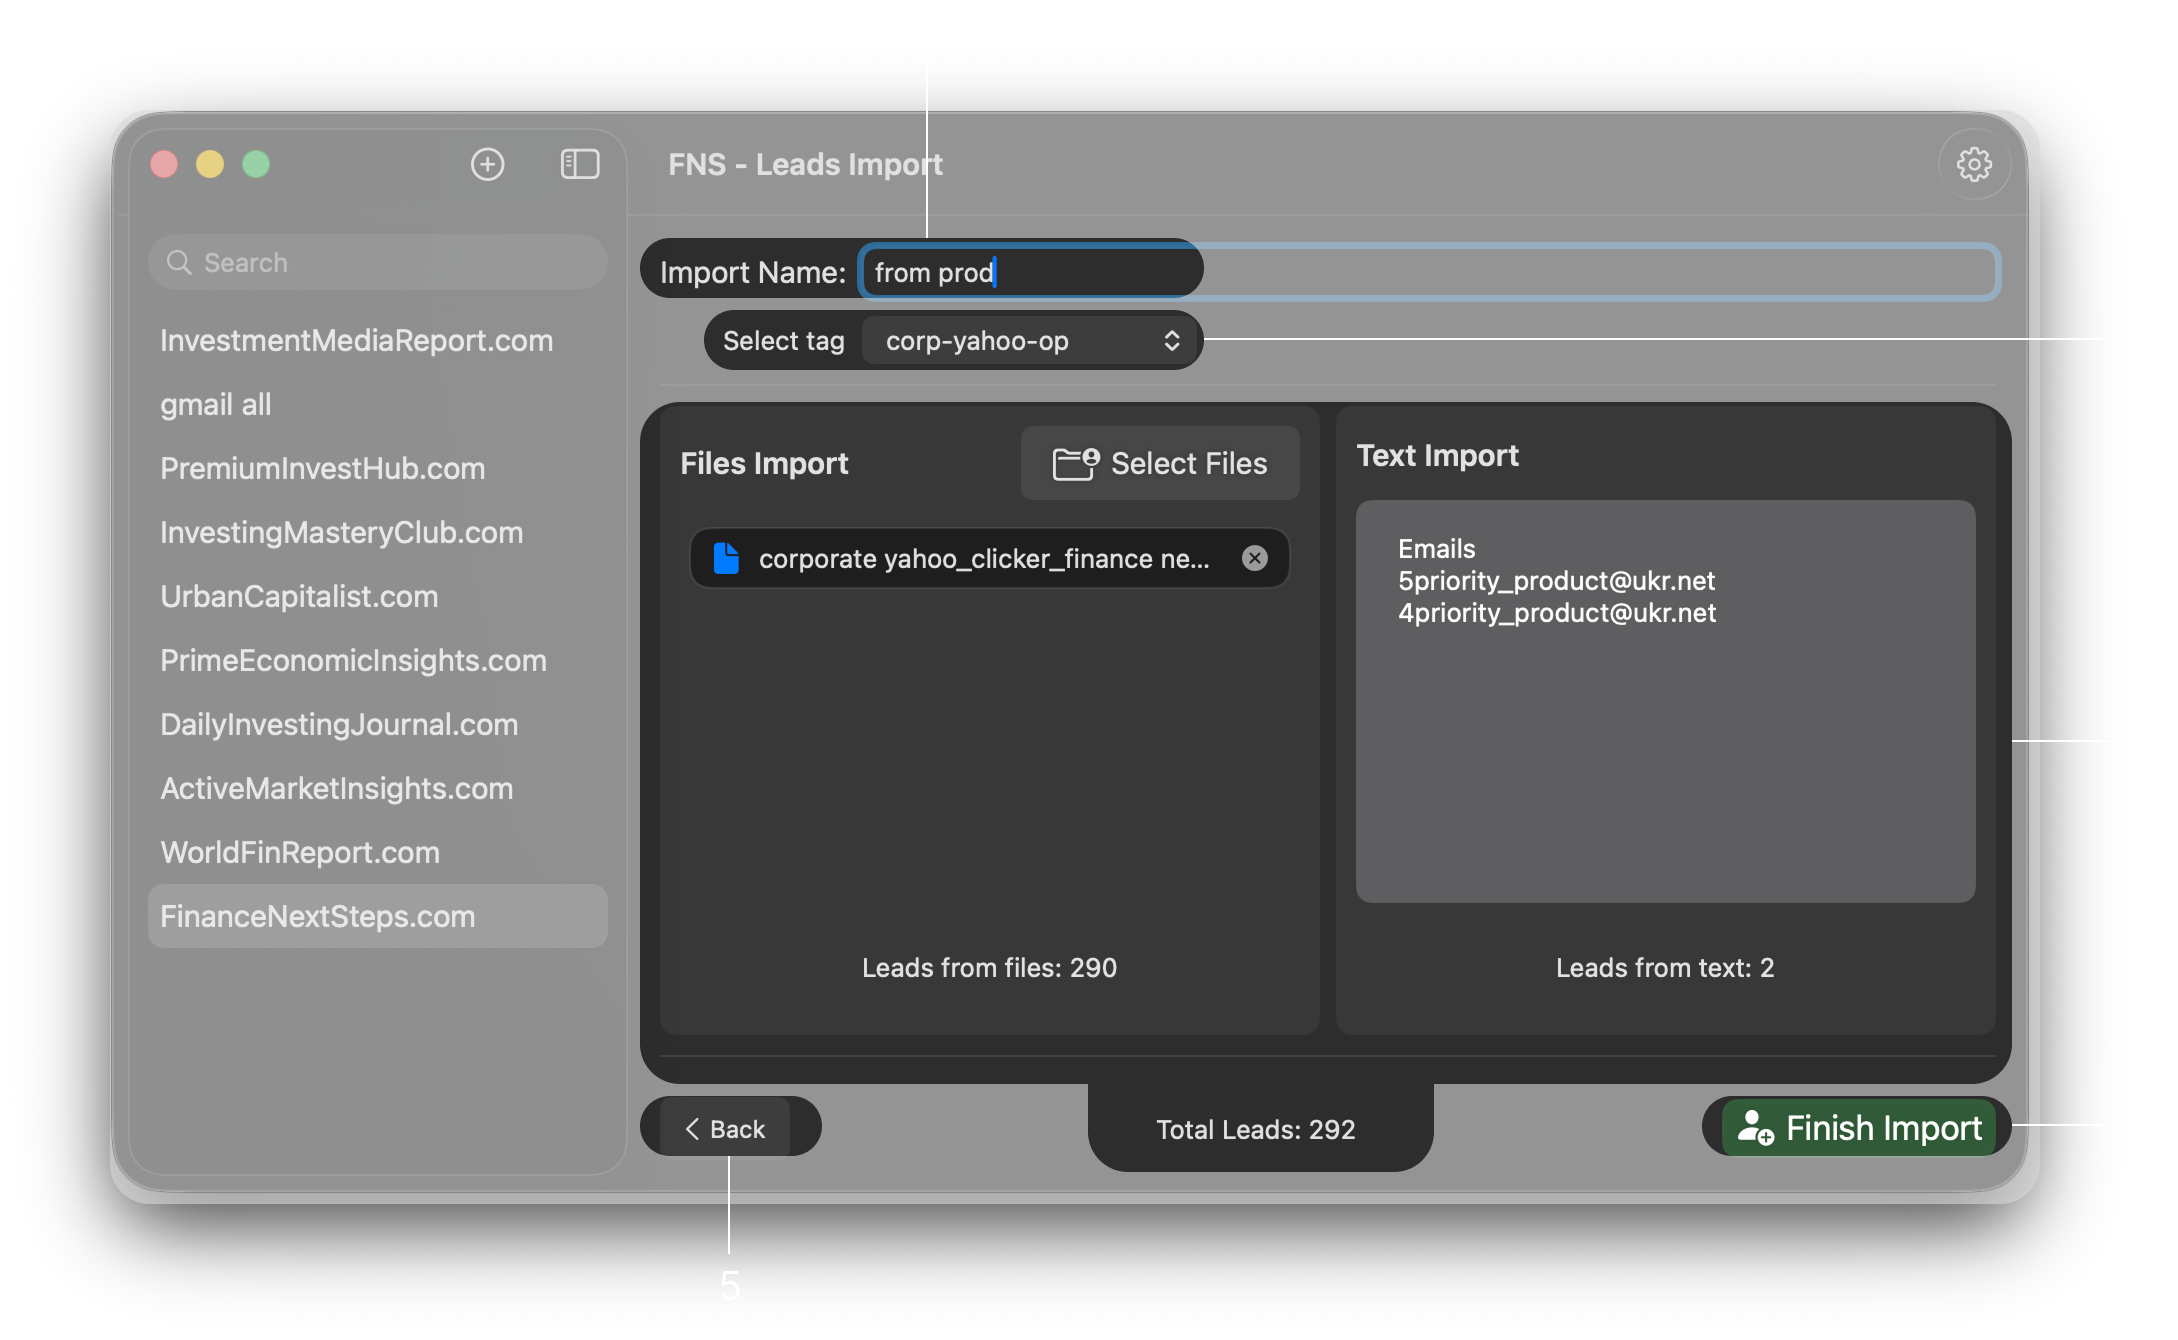
Option 1: Press the tag icon on any tag and choose 'Import'.
- Give your import a name
- Import emails from files or from text (don't forget to add the
Emailcolumn at the top of the text field) - Check if the email count shows the expected number
- Press Finish Import and wait
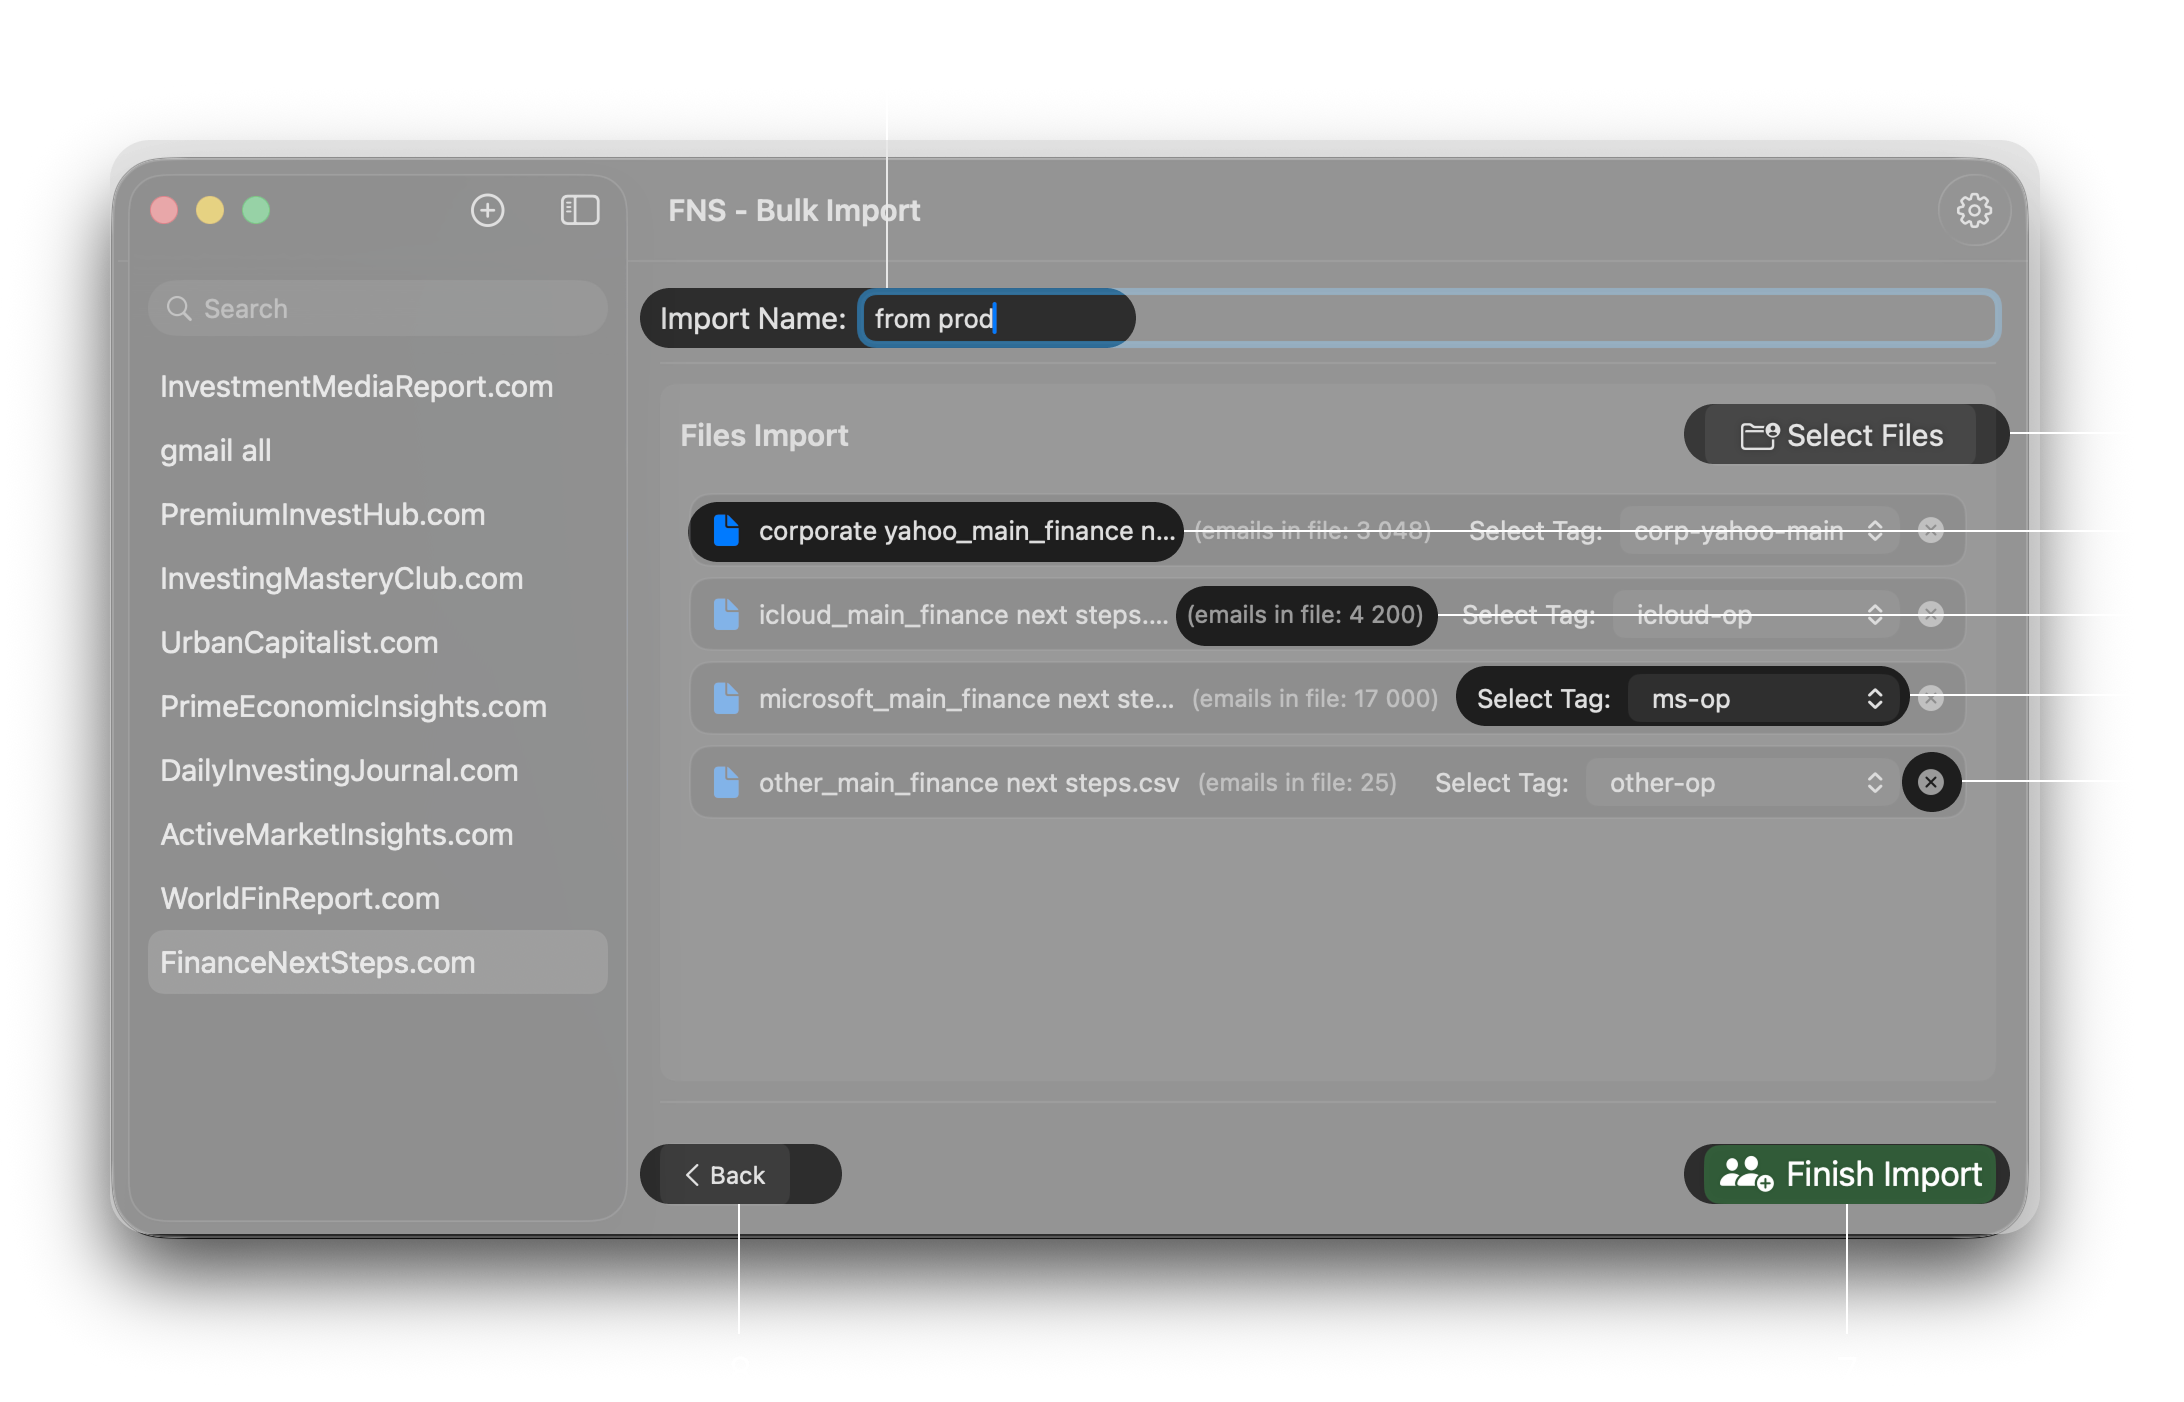
Option 2: Press the button with two people and choose Bulk Import.
- Upload emails from files to different tags at once
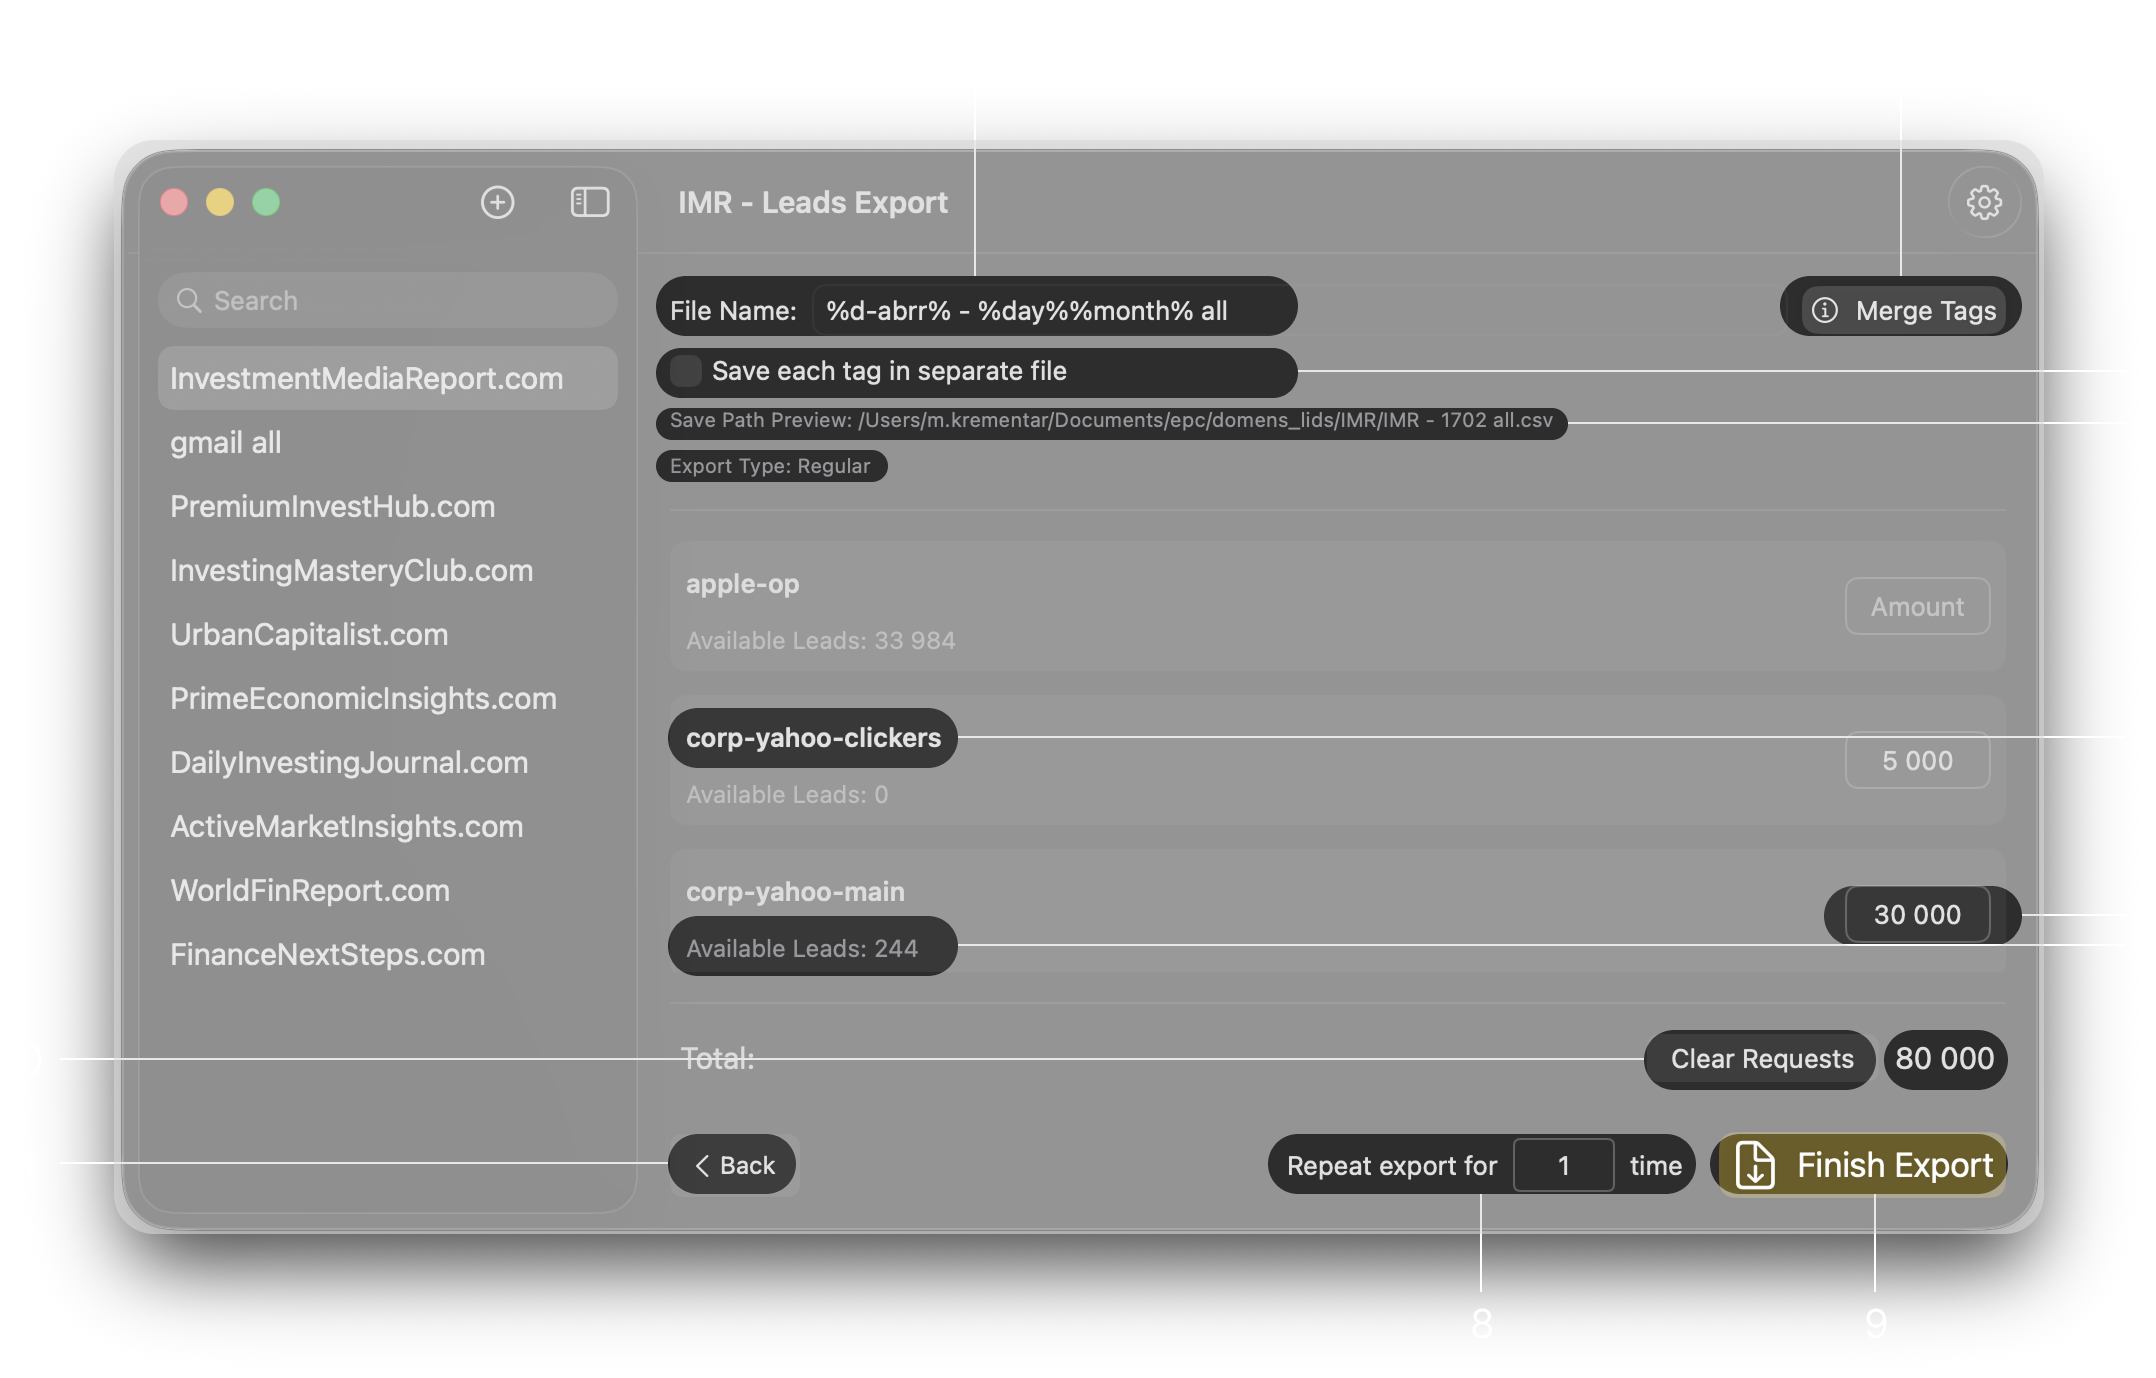
Create Export
Press the Create Export button in the top right corner.
Step-by-step:
- Give your export file a name
- Use merge tags in file and folder names by pressing the merge tags button and choosing the tags you want
- Paste it into the file name field and see a preview below (save path preview)
- Choose if you want all tags combined in one file or each tag in separate files
- Type the amount of each tag you want in your export (leave tags you don't need empty)
- Check if the total email amount is as expected
- Press Finish Export and wait
Your export is finished! The file will be in the path you specified while creating the domain.
You can see this export in the Exports History tab near the Create Export button.
Congratulations, you just created your first export!
Other Features
1. Limit Emails Overuse
Prevent email overuse by limiting how often emails are exported. Set limits within a domain or globally across all domains.
- Domain-level limits: "Don't use emails that were exported in the last X days within this domain"
- Global limits: "Don't use emails that were exported in the last X days across any domain"
2. Export in Needed Format
Export your email lists in multiple formats to match your esp:
Regular- Standard CSV file withEmailheaderExact Target- CSV File withEmail AddressandSubscriber Keyheaders. Ready to be imported into targetBlueshift- CSV File withemailcustomer_idanddomainheaders. Ready to be imported into blueshift
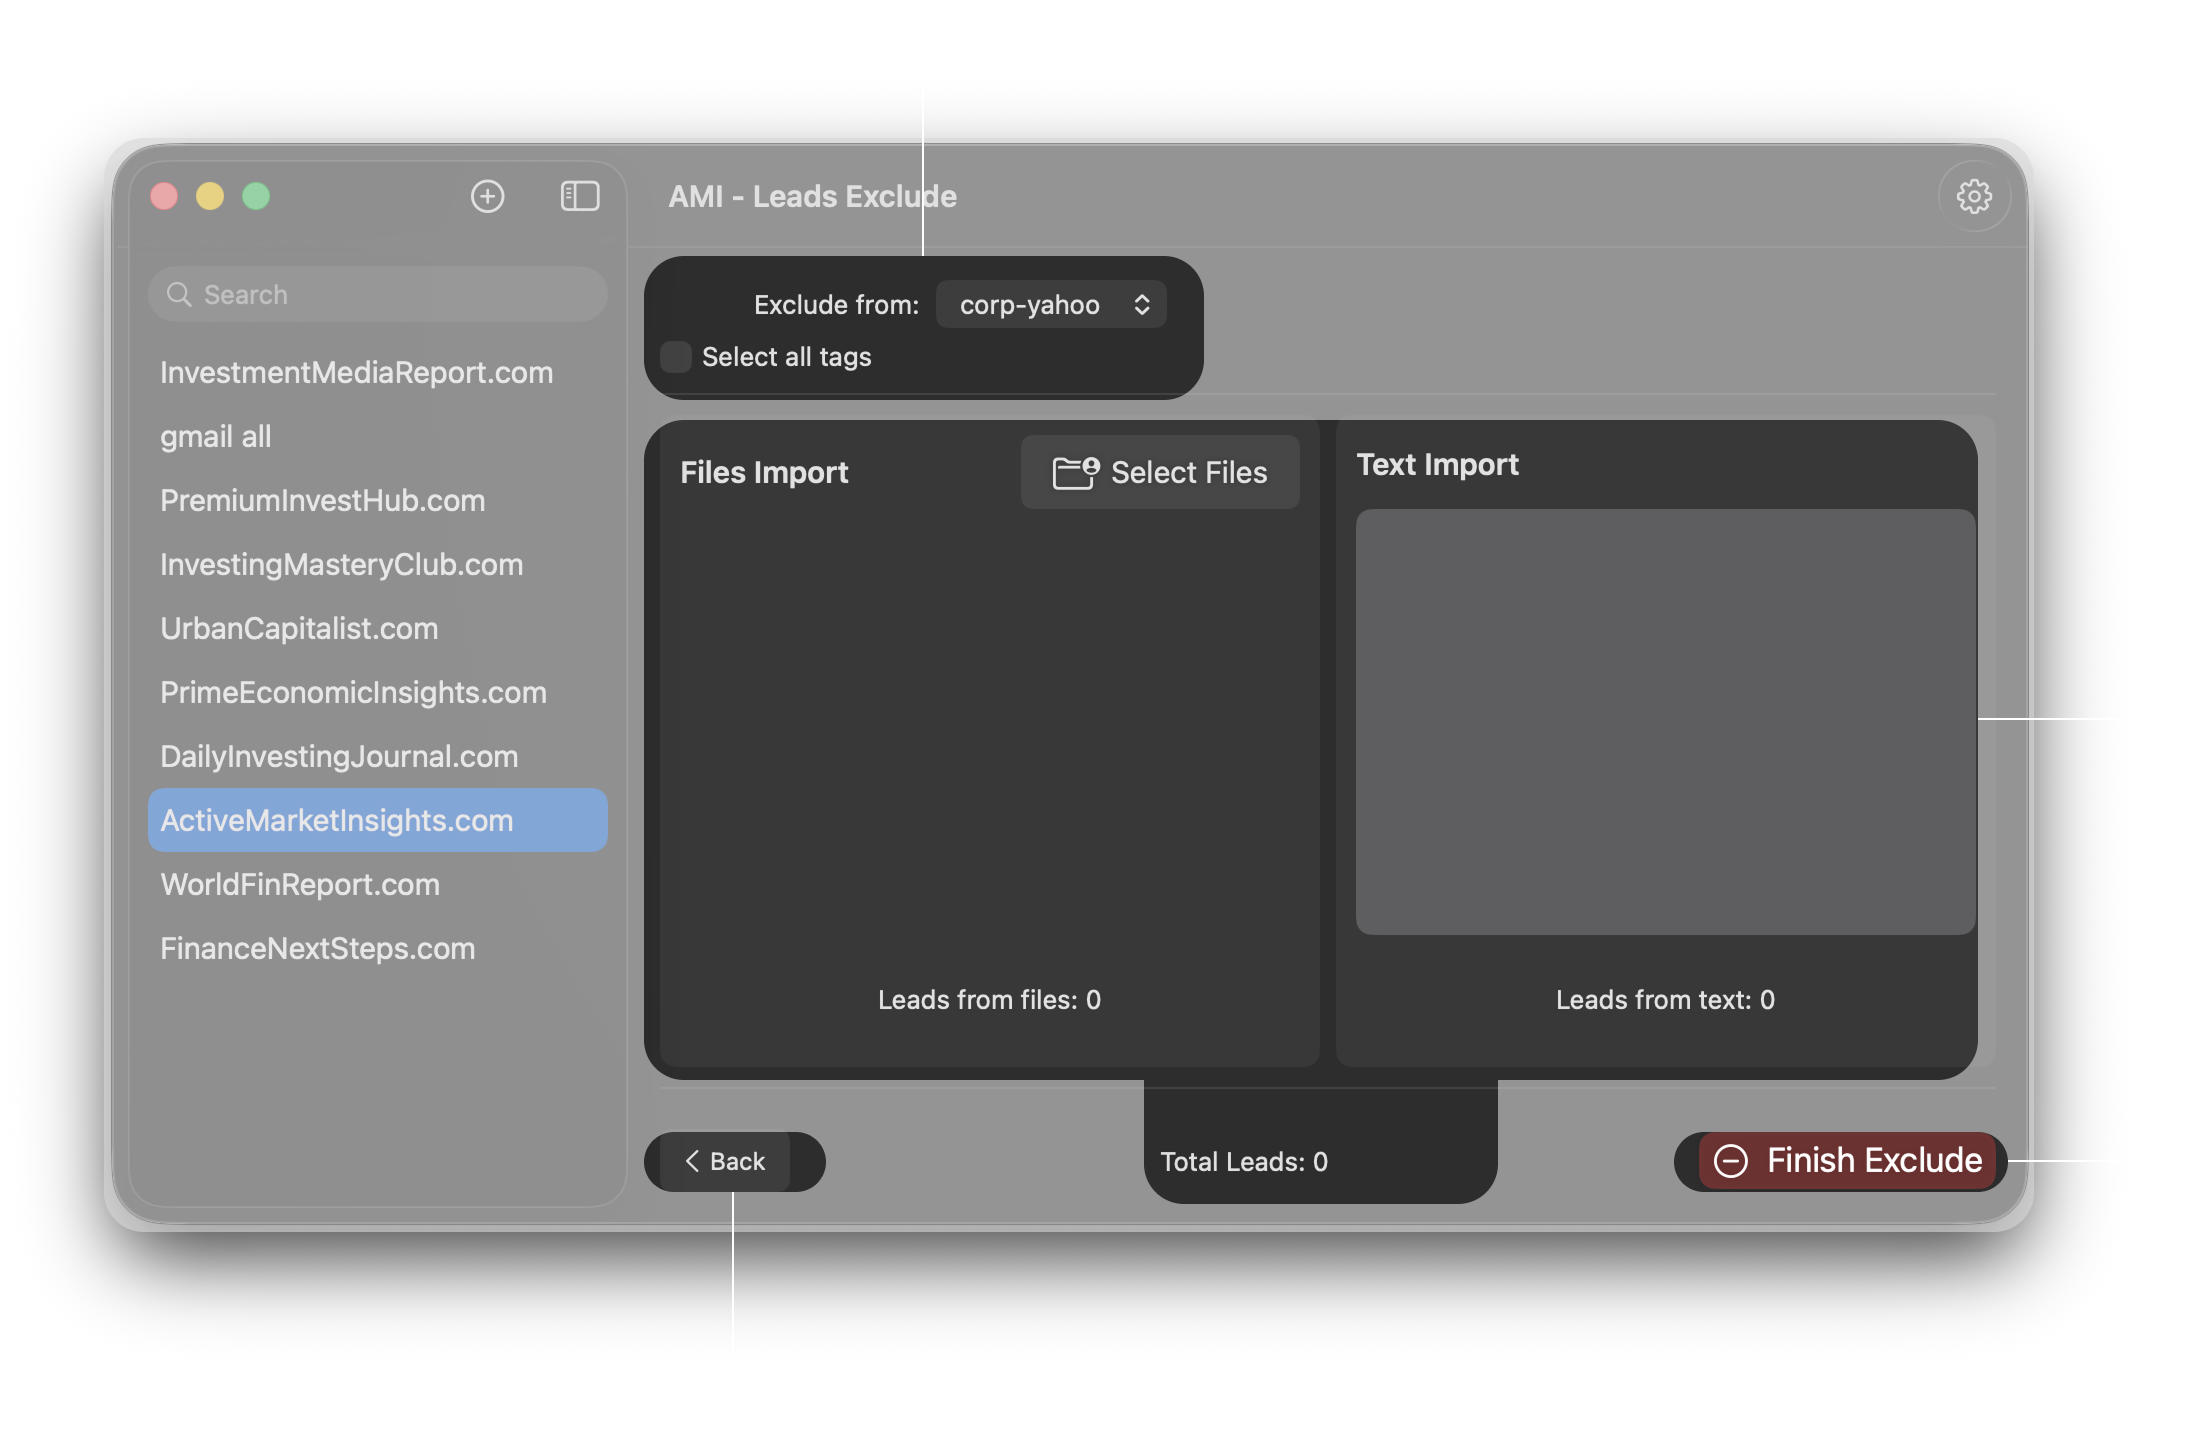
3. Download and Exclude Emails Easily
Download emails, validate them using third-party services, and easily exclude all invalid emails.
Manage downloading and exclusions at different levels:
- Global exclusions: Exclude emails across all tags inside domain
- Tag-level exclusions: Exclude emails within specific tag individually
4. Merge Tags in Export Names
Use merge tags for automatic file name generation. Makes organizing exports faster and more consistent.
Example: %d-abrr% - %day%%month% - %t-all% automatically becomes
IMH - 0309 - yahoo_5k__other_20k__comcast_600 without ever changing the name
each day or upon changing tag amounts.
Detailed Interface Guide
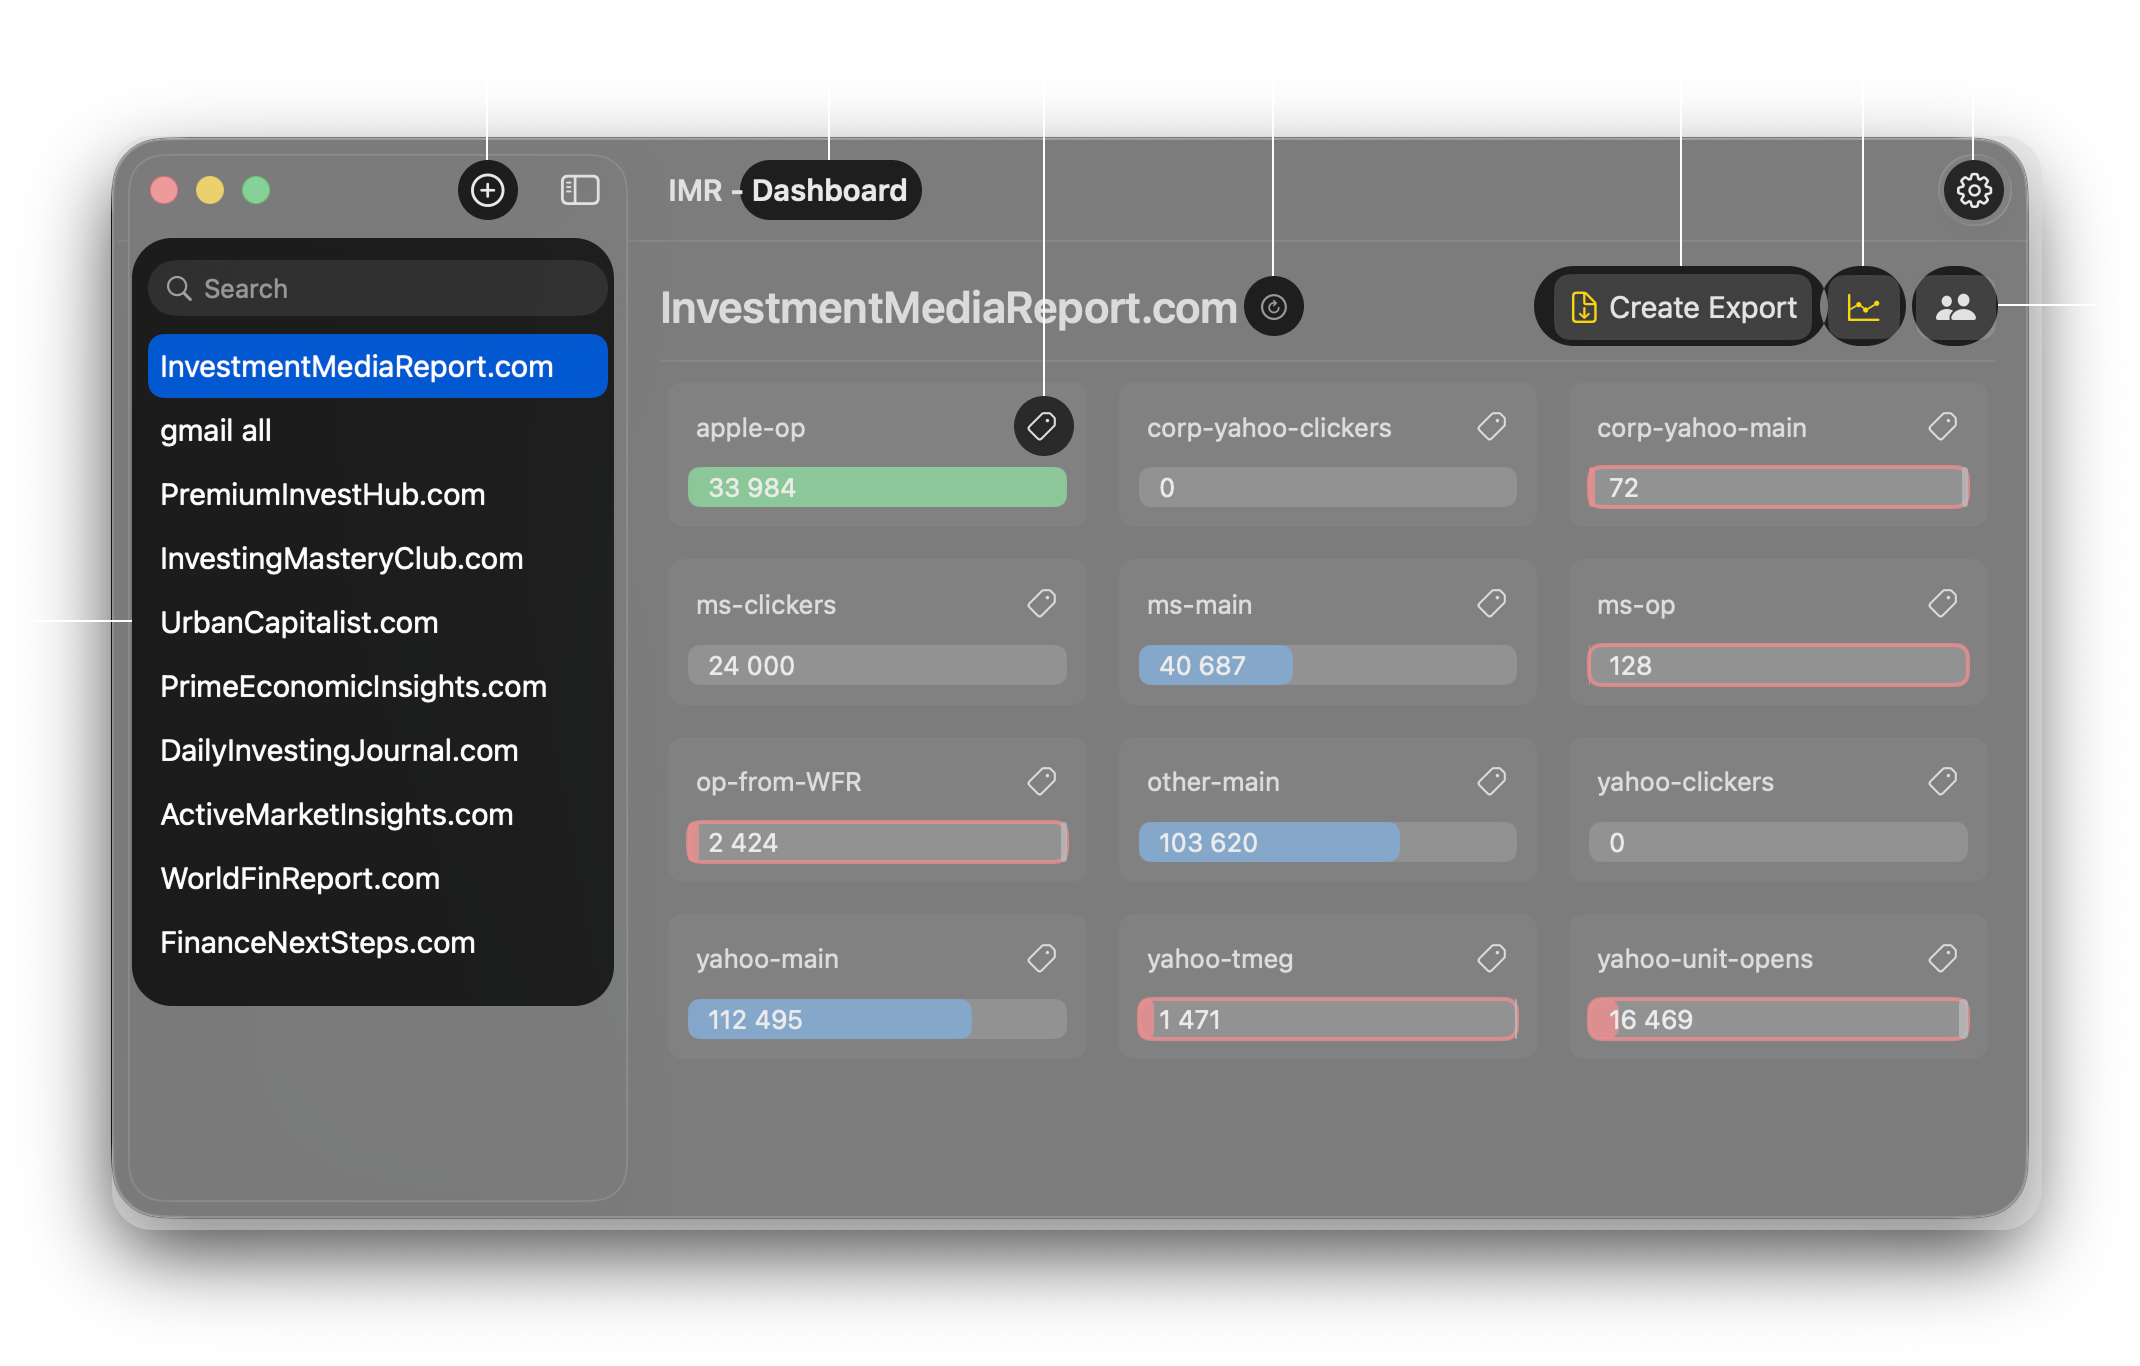
Dashboard & Domains List
Domain Settings
Regular- Standard CSV file withEmailheaderExact Target- CSV file withEmail AddressandSubscriber Keyheaders, ready to be imported into Salesforce Marketing CloudBlueshift- CSV file withemail,customer_id, anddomainheaders, ready to be imported into Blueshift
Tag Block
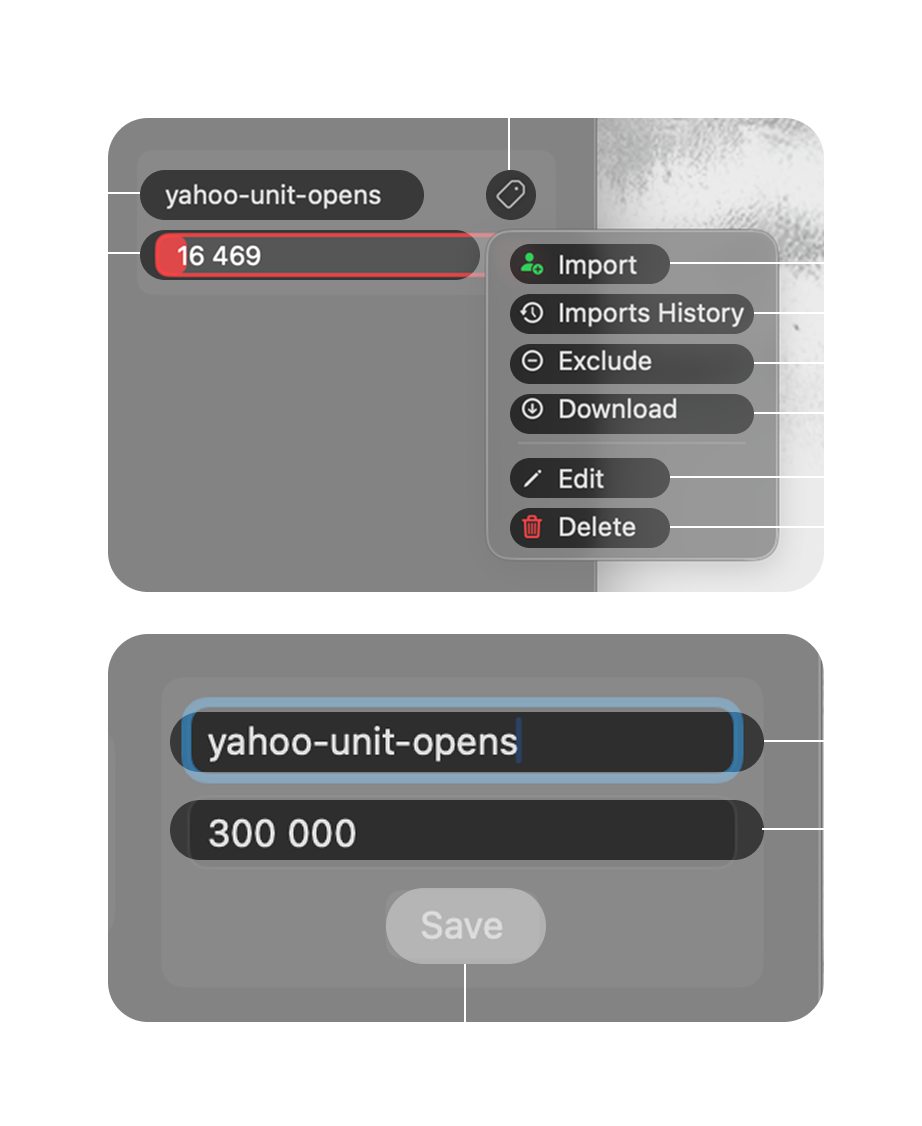
Bulk Actions Menu
Standard Emails Importer
Import Tab
Bulk Import Tab
Import History
Export Tab
%d-name% (Domain name),
%d-abrr% (Domain abbreviation),
%day% (Current day),
%month% (Current month),
%t-all% (Info about all tags in export),
%t-name% (Current tag name - separate files mode only),
%t-amount% (Requested emails amount - separate files mode only).
Exports History Tab
Download Tab
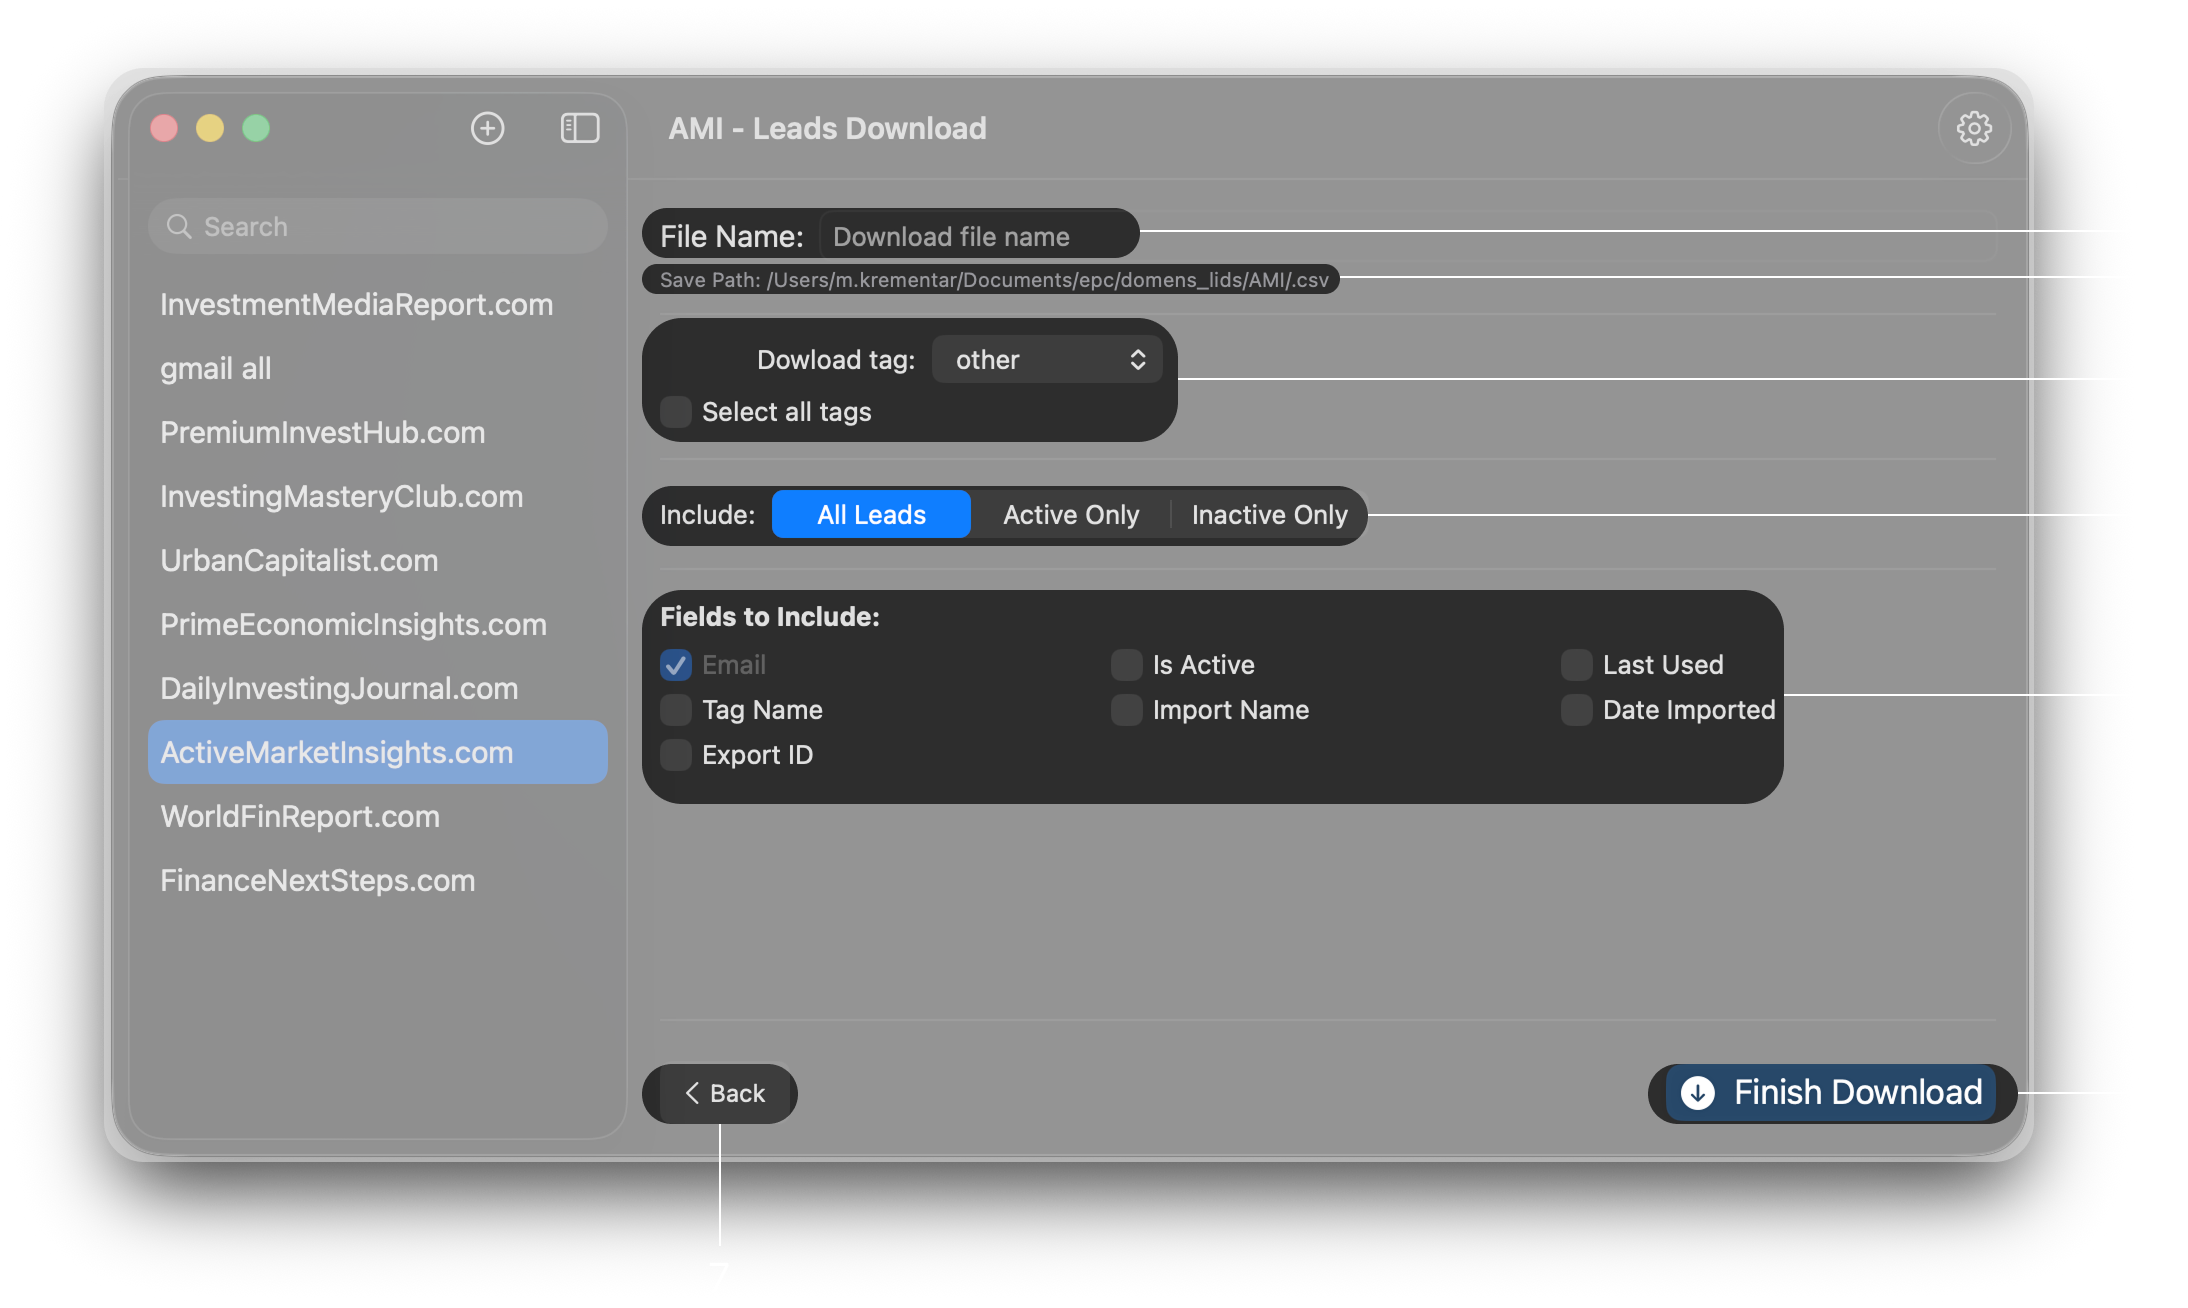
- Tag Name: The tag the email belongs to.
- Is Active: Usage status (Active/Inactive).
- Import Name: Name of the last import source.
- Date Imported: The date the email was added/updated.
- Export ID: ID of the last export it was used in.
- Last Used: Timestamp of the last export.
Exclude Tab